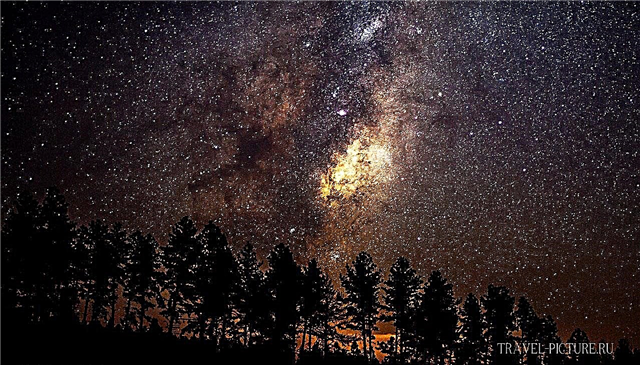
In this article we will tell and show you how to photograph a starry sky, the article will be useful for beginners - travelers or professionals who are not used to photographing only themselves and the sights of different countries of the world on vacation. Let's start making variety in photography and start by asking how to take a photo of the starry sky.
To photograph a starry sky, we need a night that needs to wait, but while you are waiting for a dark night, you can choose a landscape that will slightly fall into the frame along with the starry sky. Taking pictures of the starry sky is within the power of any simple novice - a traveler, even with an ordinary soap dish, so follow the advice of the travel team of the travel-picture.ru website, but if this is your first time for you, then read the article on how to take pictures correctly.

Options for photographing the starry sky
Now let's decide on the option for displaying the stars, you can make the stars barely visible, or you can make the stars appear as a lot of spotlights clearly visible on a dark background, another option for photographing the starry sky is shooting the movement of the stars, with this option you will have whole tracks of stars. All of the above options require a certain time of exposure. The first option is suitable if you set the shutter speed in the camera settings from 10 to 30 seconds. The second option will require setting the time delay from 30 seconds to 1 minute and the third option from 5 minutes of exposure to several hours.
Another separate option for photographing the starry sky is the professional option, which is called Timelapse among photographers, this direction is becoming more and more popular among photography. The secret of this option is that you photograph one landscape for a very long time, sometimes even several days. The photo is taken with a break of about 1 second, then it is all glued together in a special video processing program, the number of photos for a video clip in 1 minute is from 1000 pieces.

We will give a little advice, if you buy a DSLR from your hands, be sure to ask if timelapse was filmed on your future camera, the thing is that after this shooting option, the shutter mechanism fails in many cameras, which will additionally cost you a round sum of repairs.
What you need to photograph
Let's return to the question - how to photograph a stellar abyss. The next attribute for photographing a starry sky, we need a camera, we already told you how to choose a camera in the last article, then you need a high-aperture lens, you don't know how to choose a lens, then read our detailed article about the lens, and the last attribute is a tripod. At the expense of the tripod, you should immediately warn that if you shoot in the winter, set the tripod on frozen ground for about five minutes. This technique allows the tripod to cool down and the tripod legs are finally fixed in the ground, thus the long exposure photography is not blurry.
So, to open the question, we need: a camera, a lens, a tripod, a night, a battery and, preferably, a remote control to release the shutter. For those who do not know what a trigger is - an ordinary remote for professional long exposure photography, many photographers call such a remote - a cable.

We will give advice about the battery, since shooting at long exposures consumes the battery very quickly, then for shooting we need either a fully charged battery or another spare one. According to technical data, the power consumption for long exposures is 10 times more than in normal shooting, make conclusions whether you need a spare battery.
So, after waiting for the onset of night, we begin to photograph the night landscape. Let's start by setting the correct settings, follow our advice and write down your cheat sheet. It is imperative to open the diaphragm to the maximum allowable value. In our case, we used a Sigma AF 15mm f / 2.8 EX lens, the maximum aperture value for this lens is 2.8, you can take a lens with an even higher aperture.
Now make sure that you are in complete darkness, there should be no light from city lanterns and nearby houses, that is, additional light sources should be completely excluded, only at night, without a single source of light. The second moment, the shooting of the starry sky should be made only before the moon leaves the horizon, otherwise an additional light source will not let you see the stars and will just shine them.
From the camera settings, we have already talked about the maximum open aperture, which will allow you to see the stars in the photo as accurately as possible. In the camera, we set the shutter speed for at least 5 seconds and ISO at least 640, depending on the lens, all this we do on a tripod that is well-set on the ground in advance. If there is no tripod, which in our case happened more than once, then the usual solid fixed surface, on which you can put the camera with the lens up, saves, the main thing is not to scratch the camera display.

In order for the shooting to be made with high quality, you need to eliminate blurring of the photo when shooting with a long exposure, you need to install a cable with a remote control that has a shutter button that you press when you are ready to take pictures. But we get by with a simpler option, set the shooting delay for 10 seconds in the camera settings and move away, in 10 seconds the camera will stop shaking and stand still. We hope you understand what kind of delay we are talking about, with such a delay they like to be photographed with the whole family, they put a delay in order to have time for everyone to get together in front of the camera lens.
Excerpt when photographing the starry sky
If you set a long shutter speed, then the stars begin to look like stripes and the earth rotates correctly, if you set a short shutter speed, the stars will be hard to see. How do you capture that moment? There are two ways: trial and error method and the second method - rule 600. The first method of photographing the starry sky is clear to everyone, until you try all the options with the camera settings, you do not understand exactly what you need.

Let's talk about the second method in more detail, rule 600 tells us about dividing the number 600 by the focal length of the lens. In our case, we used a Sigma AF 15mm f / 2.8 EX lens, which means that 600 is divided by 15mm, we get a shutter speed of 40 seconds. For cameras with a crop matrix, the final result needs to be divided by another 1.6, we get an exposure of 25 seconds.
What aperture to set when shooting
The most optimal option for photographing the starry sky is the maximum open "hole" for your lens, the more aperture your lens is, the better. In our case, we used the Sigma AF 15mm f / 2.8 EX lens, the aperture of this lens is 2.8, the aperture of 1.8 - 2.8 is considered the ideal option for shooting the starry sky.
What should be the focus?
Automatic focusing at night is unlikely to work 100 percent, so without puzzling how to take a picture and without tormenting ourselves, we switch to mechanical focusing, or otherwise called manual focus. We advise you to set focus to the most extreme position at focusing infinity. Focal length tip, with the 15mm focal length as an example, we have already calculated the shutter speed of 40 seconds for a full frame and 25 seconds for a crop.
So this rule applies up to a distance of 50mm, then the longer the focal length, the much shorter the shutter speed should be, in simple terms we can say this - the longer the focal length (from 50 mm ...), the closer the stars are to us, and therefore the shutter speed is long we don't need it.
Options when shooting the night sky
I recommend setting the approximate parameters as follows:
- it is best to use lenses of 14 or 16 mm.,
- set the ISO parameters to 200, then, if nothing is visible, then we will increase the value to ISO 400,
- open the aperture from f4 to f5.6,
- I recommend selecting the shutter speed in manual mode, the brightness should correspond to the author's idea. If the shutter speed is short (in most devices it is no more than 30 seconds), then we increase the ISO to 400 or more,
- As for focusing, this is a problem at night, so we switch to manual focusing mode.
How to shoot timelapse
To begin with, let's talk about a program for gluing a huge amount of footage, in fact, there are a lot of such programs and almost all of them are free. But for a beginner in this business, we recommend a simple and convenient program Startrails Version 1.1. You can download it everywhere and for free, so we will not post the link.
Shooting a time-lapse is a very painstaking and long work that requires a huge amount of nerves and free time, it took us 2 nights for this type of photography of the starry sky, during this time we were very exhausting, but you simply must try this type of shooting, this is a very big step to professional photography, and a very exciting event awaits you.
For about 10 seconds of a timelapse video, you will need to shoot 100 photos. The approximate camera settings that we used, despite the fact that you shoot in complete darkness without a single light source interfering with you, are as follows: ISO 1000, focal length 15mm, maximum aperture 2.8, shutter speed 30 seconds. Duration of night work for a 10 second clip is approximately 50 minutes.
Now a little math, in order to shoot a 10 minute video in timelapse mode, we will need a lot of time. 1 second of video contains 24 frames, 60 seconds in a minute, 60 * 24 = 1440 frames, a 10 minute video clip contains 14440 frames (1440 frames * 600 seconds). Taking each photo with an exposure of 30 seconds, pausing for 1 second, we get 31 seconds * 14440 frames = 447640 seconds or 124 hours of working time.
This is exactly how much time it takes to shoot a high-quality video clip, but even more effort and money is spent on restoring equipment after such work. In conclusion, a few tips when photographing. There must be no moon, shoot before it appears, otherwise you will get highlights and the stars will not be visible. Shoot away from city lights, the lanterns also light up everything and you won't see anything.
Take a cloth for cleaning the lens with you, it is very often humid at night and fogging is guaranteed for you. Further, with prolonged photographing, the matrix of any camera begins to heat up, as a result of this, noise or light grainy dots appear in the photo, but some cameras have a noise reduction function that will save you. If there is no such function, give the camera a short break from work, otherwise the whole thing will go downhill.
Do not forget to experiment with the camera settings, choose the terrain of the mountains or the forest and you will get a photo with an unforgettable starry sky, which will take the first place among the photos taken on an exciting journey together in the team of the website travel-picture.ru